
【CentOS】安装邮件服务器postfix-dovecot
转载一篇Centos 6上安装邮件服务器的文章
How to setup mail server in centos 6 ( postfix-dovecot )
This article describes how to setup a mail server in centos 6 . Here i have used three popular packages which is very easy to configure .
» Postfix ( for sending )
» Dovecot ( for receiving )
» Squirrelmail ( for webmail access )
This guide is strictly for learning purpose , not for real time servers .
Let’s start
Setup mail server in centos 6
» Installing and configuring postfix
» Installing and configuring dovecot
» Installing and configuring squirrelmail
» Installing and configuring postfix
Step 1 »Before installation assign a static ip and add a host entry for your domain to that IP in the /etc/hosts file like below.
192.168.0.15 krizna.com
Step 2 » Issue the below command to install postfix
[root@mail ~]# yum -y install postfix
Step 3 » Now issue the below command to install SMTP AUTH packages .
[root@mail ~]# yum -y install cyrus-sasl cyrus-sasl-devel cyrus-sasl-gssapi cyrus-sasl-md5 cyrus-sasl-plain
Postfix package installation is completed .
Step 4 » Issue the below commands one by one for creating SSL Cert.
[root@mail ~]# mkdir /etc/postfix/ssl

[root@mail ~]# cd /etc/postfix/ssl/

[root@mail ssl]# openssl genrsa -des3 -rand /etc/hosts -out smtpd.key 1024

[root@mail ssl]# chmod 600 smtpd.key

[root@mail ssl]# openssl req -new -key smtpd.key -out smtpd.csr

[root@mail ssl]# openssl x509 -req -days 365 -in smtpd.csr -signkey smtpd.key -out smtpd.crt

[root@mail ssl]# openssl rsa -in smtpd.key -out smtpd.key.unencrypted

[root@mail ssl]# mv -f smtpd.key.unencrypted smtpd.key

[root@mail ssl]# openssl req -new -x509 -extensions v3_ca -keyout cakey.pem -out cacert.pem -days 365
Step 4 » Now open /etc/postfix/main.cf file .
Find and comment the below lines .
#inet_interfaces = localhost #---> line no 116

#mydestination = $myhostname, localhost.$mydomain, localhost #--> line no 164
and add these lines at the bottom of the file.
|
1
2
3
4
5
6
7
8
9
10
11
12
13
14
15
16
17
18
19
20
21
22
23
|
myhostname = mail.krizna.com
mydomain = krizna.com
myorigin = $mydomain
home_mailbox = mail/
mynetworks = 127.0.0.0/8
inet_interfaces = all
mydestination = $myhostname, localhost.$mydomain, localhost, $mydomain
smtpd_sasl_auth_enable = yes
smtpd_sasl_type = cyrus
smtpd_sasl_security_options = noanonymous
broken_sasl_auth_clients = yes
smtpd_sasl_authenticated_header = yes
smtpd_recipient_restrictions = permit_sasl_authenticated,permit_mynetworks,reject_unauth_destination
smtpd_tls_auth_only = no
smtp_use_tls = yes
smtpd_use_tls = yes
smtp_tls_note_starttls_offer = yes
smtpd_tls_key_file = /etc/postfix/ssl/smtpd.key
smtpd_tls_cert_file = /etc/postfix/ssl/smtpd.crt
smtpd_tls_CAfile = /etc/postfix/ssl/cacert.pem
smtpd_tls_received_header = yes
smtpd_tls_session_cache_timeout = 3600s
tls_random_source = dev:/dev/urandom
|
Step 5 » Now open /etc/postfix/master.cf file and add the below line after smtp
|
1
2
3
4
5
|
smtps inet n - n - - smtpd
-o smtpd_sasl_auth_enable=yes
-o smtpd_reject_unlisted_sender=yes
-o smtpd_recipient_restrictions=permit_sasl_authenticated,reject
-o broken_sasl_auth_clients=yes
|
Step 6 » Now start postfix and saslauthd service
[root@mail ~]# service postfix start
[root@mail ~]# service saslauthd start
» Issue the below commands to start the postfix and saslauthd at startup
[root@mail ~]# chkconfig --level 235 postfix on
[root@mail ~]# chkconfig --level 235 saslauthd on
Step 7 » Now check your smtp connectivity . just telnet localhost on port 25 and type this command ehlo localhost
[root@mail ~]# telnet localhost 25

Trying ::1...

Connected to localhost.

Escape character is '^]'.

220 mail.krizna.com ESMTP Postfix

ehlo localhost <---- type this command

250-mail.krizna.com

250-PIPELINING

250-SIZE 10240000

250-VRFY

250-ETRN

250-STARTTLS

250-AUTH PLAIN LOGIN

250-AUTH=PLAIN LOGIN

250-ENHANCEDSTATUSCODES

250-8BITMIME

250 DSN

quit

221 2.0.0 Bye

Connection closed by foreign host.
If you get this output .. Great .. everything is fine till now.
» Installing and configuring dovecot
Step 8 » Issue this command to install dovecot
[root@mail ~]# yum -y install dovecot
Step 9 » After installation open /etc/dovecot/dovecot.conf file and add the below line at the end of the file. please make sure mail_location and home_mailbox in postfix configuration are using the same name.
protocols = imap pop3将其中的#liten = *,[::]改为listen = *
mail_location = maildir:~/mail
pop3_uidl_format = %08Xu%08Xv
Step 10 » Now start dovecot service
[root@mail ~]# service dovecot start
» Issue the below command to start the dovecot at startup
[root@mail ~]# chkconfig --level 235 dovecot on
Step 11 » Now test your pop3 connectivity .
[root@mail ~]# telnet localhost 110

Trying ::1...

Connected to localhost.

Escape character is '^]'.

+OK Dovecot ready.

quit

+OK Logging out

Connection closed by foreign host.
Yes .. your server is ready to receive mails .
» Creating users and testing
Step 11 » Now create users to test your configuration.
[root@mail ~]# useradd -m bobby -s /sbin/nologin
[root@mail ~]# useradd -m leela -s /sbin/nologin
and create passwords for the users created
[root@mail ~]# passwd bobby
[root@mail ~]# passwd leela
Step 12 » Test your configuration in thunderbird . Refer the below image for configuration details.
 此处可以下载Foxmail进行测试。
Step 13 » Now you can send and receive mails using this server. In case of any issues please check the log file /var/log/maillog )
your mail server is ready …
如果发现telenet 域名 25端口不同,则尝试在 /etc/postfix/main.cf 中增加配置inet_interfaces = $myhostname, localhost后重启devecot服务service dovecot restart
» Installing and configuring squirrelmail
Step 14 » you need to add EPEL repository to install squirrelmail package. you can find latest EPEL repository rpm here ( http://ftp.jaist.ac.jp/pub/Linux/Fedora/epel/6/i386/repoview/epel-release.html )
[root@mail ~]# rpm -ivh http://ftp.jaist.ac.jp/pub/Linux/Fedora/epel/6/i386/epel-release-6-8.noarch.rpm
Step 15 » Issue the below command to install squirrelmail.
[root@mail ~]# yum install squirrelmail
This command will install squirrelmail along with apache and php.
Step 16 » Now run the below command to configure squirrelmail .
[root@mail ~]# perl /usr/share/squirrelmail/config/conf.pl
»»» 1 »»» 1 »»» krizna (type Organization name ) »»» R ( return )
»»» 2 »»» 1 »»» ( hit space for empty Domain name ) and choose 3 »»» SMTP ( choose SMTP ) »»» R ( return )
»»» D »»» dovecot ( type ) »»» press enter with default
»»» s ( save and quit)
Step 17 » Open /etc/httpd/conf.d/squirrelmail.conf file and uncomment below lines
# RewriteCond %{HTTPS} !=on

# RewriteRule (.*) https://%{HTTP_HOST}%{REQUEST_URI}
Step 18 » start apache service
[root@mail ~]# service httpd start
» Issue the below commands to start the httpd at startup
[root@mail ~]# chkconfig --level 235 httpd on
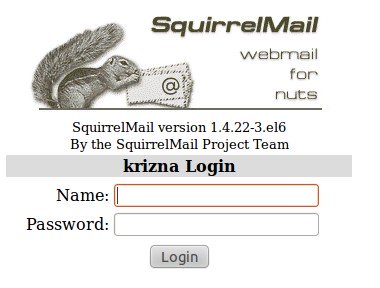
Step 19 » Now open http://serverip/webmail path in your browser . you could able to see the below page .
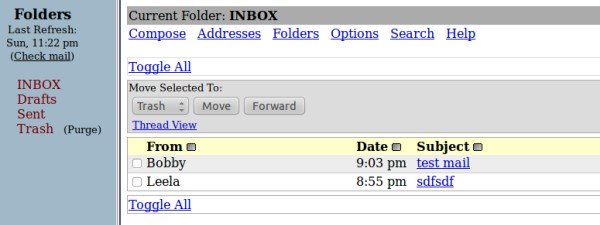
and after login
If any issues with apache check this page Installing Apache2 , Mysql server and PHP on Centos 6 (LAMP)
Also see :
» Setup mail server on centos 7
» Setup mail server on Ubuntu 14.04
Good luck.
原文:http://www.krizna.com/centos/setup-mail-server-in-centos-6/
还没有人抢沙发呢~